

Focus Stacking: How I Get Everything in Focus in My Macro Shots | by Amy Selleck
Have you ever tried to take a close-up photo of a bug or flower and noticed that only part of it is sharp, while the rest looks blurry? That’s because when you’re really close to a subject, the depth of field (the area that stays in focus) is very shallow, even when the aperture is closed down. In other words, only a small part of the image is sharp at once. This is where focus stacking comes in!
Why I Use Focus Stacking
When I photograph flowers and nature close-up, I want the entire subject to be in focus, but I also love that soft, blurry bokeh that makes the subject stand out. Using focus stacking, I can have both: a sharp subject and a beautifully blurred background.
How I Do It
Capture Multiple Shots: I take several photos of the same subject, each with a slightly different focus point. For example, I might focus on the tip of a flower petal in one shot, the stamen in the next, and the base in another.
Combine the Images: Using Adobe Photoshop and LightRoom, I edit then merge these images together. The software picks the sharpest parts from each photo and blends them into one image where the entire subject is in focus.
When I Use It
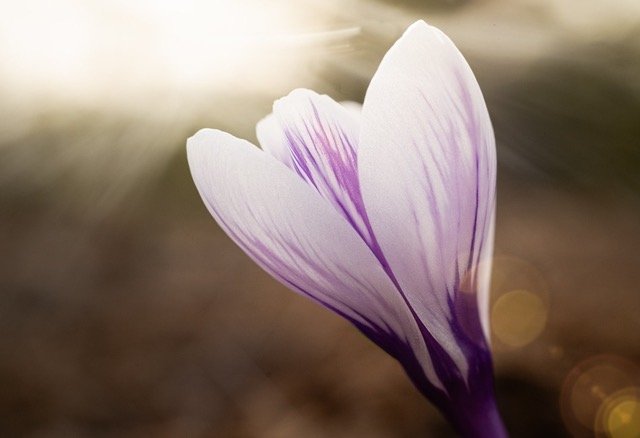
I mostly use focus stacking in macro photography, especially when shooting flowers and plants. These subjects often have intricate details that I want to capture clearly. Focus stacking allows me to showcase those details without sacrificing the aesthetic quality of the background.
Focus stacking has become an essential part of my macro photography workflow. It does require some extra steps, but the results… sharp, detailed subjects with soft, dreamy backgrounds are well worth the effort.
Step by Step Instructions

Step 1: Shooting
Compose your shot and take a few frames focusing on different parts of the subject. Try to stay as still as you can and not move the camera. For instance, with a flower, I’ll get at least 3 solid frames in focus, the front of the petals, the stamen, and the petals in the rear. Sometimes I take about 20 frames to get as many choices as possible. Using a medium range aperture is a great place to start, usually around f/8 will give you a workable depth of field.
Step 2: Lightroom Edits
Next I import my images into LightRoom and edit the main image, making all of my major adjustments, like I am only going to be using one frame. Once I’m done, I then pick at least 2 other frames with the other parts of the image in focus and sync the editing settings so they are all exactly the same.
In LightRoom and in the Develop Module, select all of the frames you want to merge together (holding command key while you click allows you to select multiple frames) , go to the “Photo” menu > “Edit in” > select “Open as Layers in Photoshop”.

Step 3 : Photoshop - Alignment and Blending
Now the magic! Photoshop will automatically open and create a file with all of the images you selected in LightRoom as layers. Select all of the layers you just imported and then go to the “Edit” menu and select “Auto Align Layers”. A dialog window will open, select “Auto”.

Select “Auto” from the Auto Align Layers window

Photoshop will stack the layers for you and depending on how much movement there was between frames, you’ll have more or less empty space on the edges.
Next, go back to the “Edit” menu and select “Auto Blend Layers” and choose the “Stack Images” option. It’s up to you if you want to check the optional boxes for seamless tones and colors and Content Aware Fill.


The final blended image. I selected “content aware fill” to have Photoshop fill in the little gaps around the image created during alignment.

Photoshop creates a new “merged” layer for you. Below that, you can see where the different layers have been masked to only reveal the parts that are in focus.
After Photoshop works its magic, you’ll have an image that should be all in focus! Isn’t that amazing and cool?! Now the easy part, select all of the layers you just aligned and blended, flatten the image and then you can continue on to your finishing edits.
I love the flexibility that focus stacking allows me to have with creating sharper, clearer images when I’m only inches away from my subject.
